You don’t have to be a meteorologist to understand how to find the perfect weather conditions to take great photographs. Planning for the weather is one of the key factors that distinguishes a successful photo from a snapshot. And this kind of planning is about so much more than just planning to go out at sunset or sunrise.
Proper photo planning usually includes studying the weather to know how it’ll affect your shot. When you understand the key variables that make for a gorgeous sunrise or sunset, you’ll start getting better and better photographs. And there are a number of free tools out there that can help you spot exactly when you’ll find those perfect cotton-candy clouds every time.
In this photography planning article, we’re going to talk exclusively about the weather. If you’d like to learn more about how to plan the perfect photo location down to the exact spot you’re going to stand, check out the first article in the series here.

What free tools do I use to determine the ideal photography conditions?
There are so many tools out there available for free. Usually the features you’ll pay for in a phone app will be free online. So I always recommend setting up a favorites folder in your browser containing the important tools. Here’s a list of the ones I’m currently using:
- Clear Outside (iOS | Android) – The best weather app for determining the ideal sunrise/sunset conditions. Shows cloud heights, rain, wind, fog, temperature, humidity Contains all of the information you’ll need to plan the best weather in the days before your photography trip.
- SunCalc (Web | Android | No iOS) — track where and when the sun will rise and set in any position on earth.
- Light Pollution Map (iOS | Android) — For astrophotographers: This app shows the few remaining areas on earth free from light pollution. Use this if you’re planning to travel to see the Milky Way, or other astrological events.
- Stellarium (Free web version, paid app) — Track stars, constellations, galaxies, deep space objects, and local events as they happen.
1. Learn nature’s perfect sunset/sunrise settings formula
There’s a simple formula that makes for perfect sunrises and sunsets. High clouds, high visibility, low wind, and low humidity. But the best light shows always come just after a rainstorm when there’s still some drama in the sky, and the air is the freshest.
Using this information, you’ll be able to accurately predict if there’s going to be an amazing sunrise or sunset. And the Clear Outside application on your phone is by far the most useful tool for finding this information. I’ve used it for years, and it’s been one of the most important tools on my phone, because of the sheer amount of information it shows the user. For example, it shows when, and how much rain there is per hour and the percentages of high and low cloud in a given location.
You can also save different locations by using coordinates to get the updates for locations out of the way. The data will be the most accurate closer to weather stations in the major centers. As always, predicting the weather is an imperfect science. So All of the predictions from these apps should be taken with a grain of salt. In fact, I’ve gone out many times when the weather wasn’t looking all that great, and still come across absolutely stunning sunrises and sunsets. Getting these shots is about persistence and patience.

2. Learn the direction of the sunrise and sunset at your destination
Some of the best scenes in the world only happen a couple of days out of the year. Like having the red glow underneath the Mesa Arch, or seeing the red light from a specific vantage point on the top of a mountain. These types of photographs always require a certain amount of planning. You’ll have to know the position of the sun to get these perfect conditions. But luckily, the science behind this is very well understood, so there are plenty of free tools for getting the information you need.
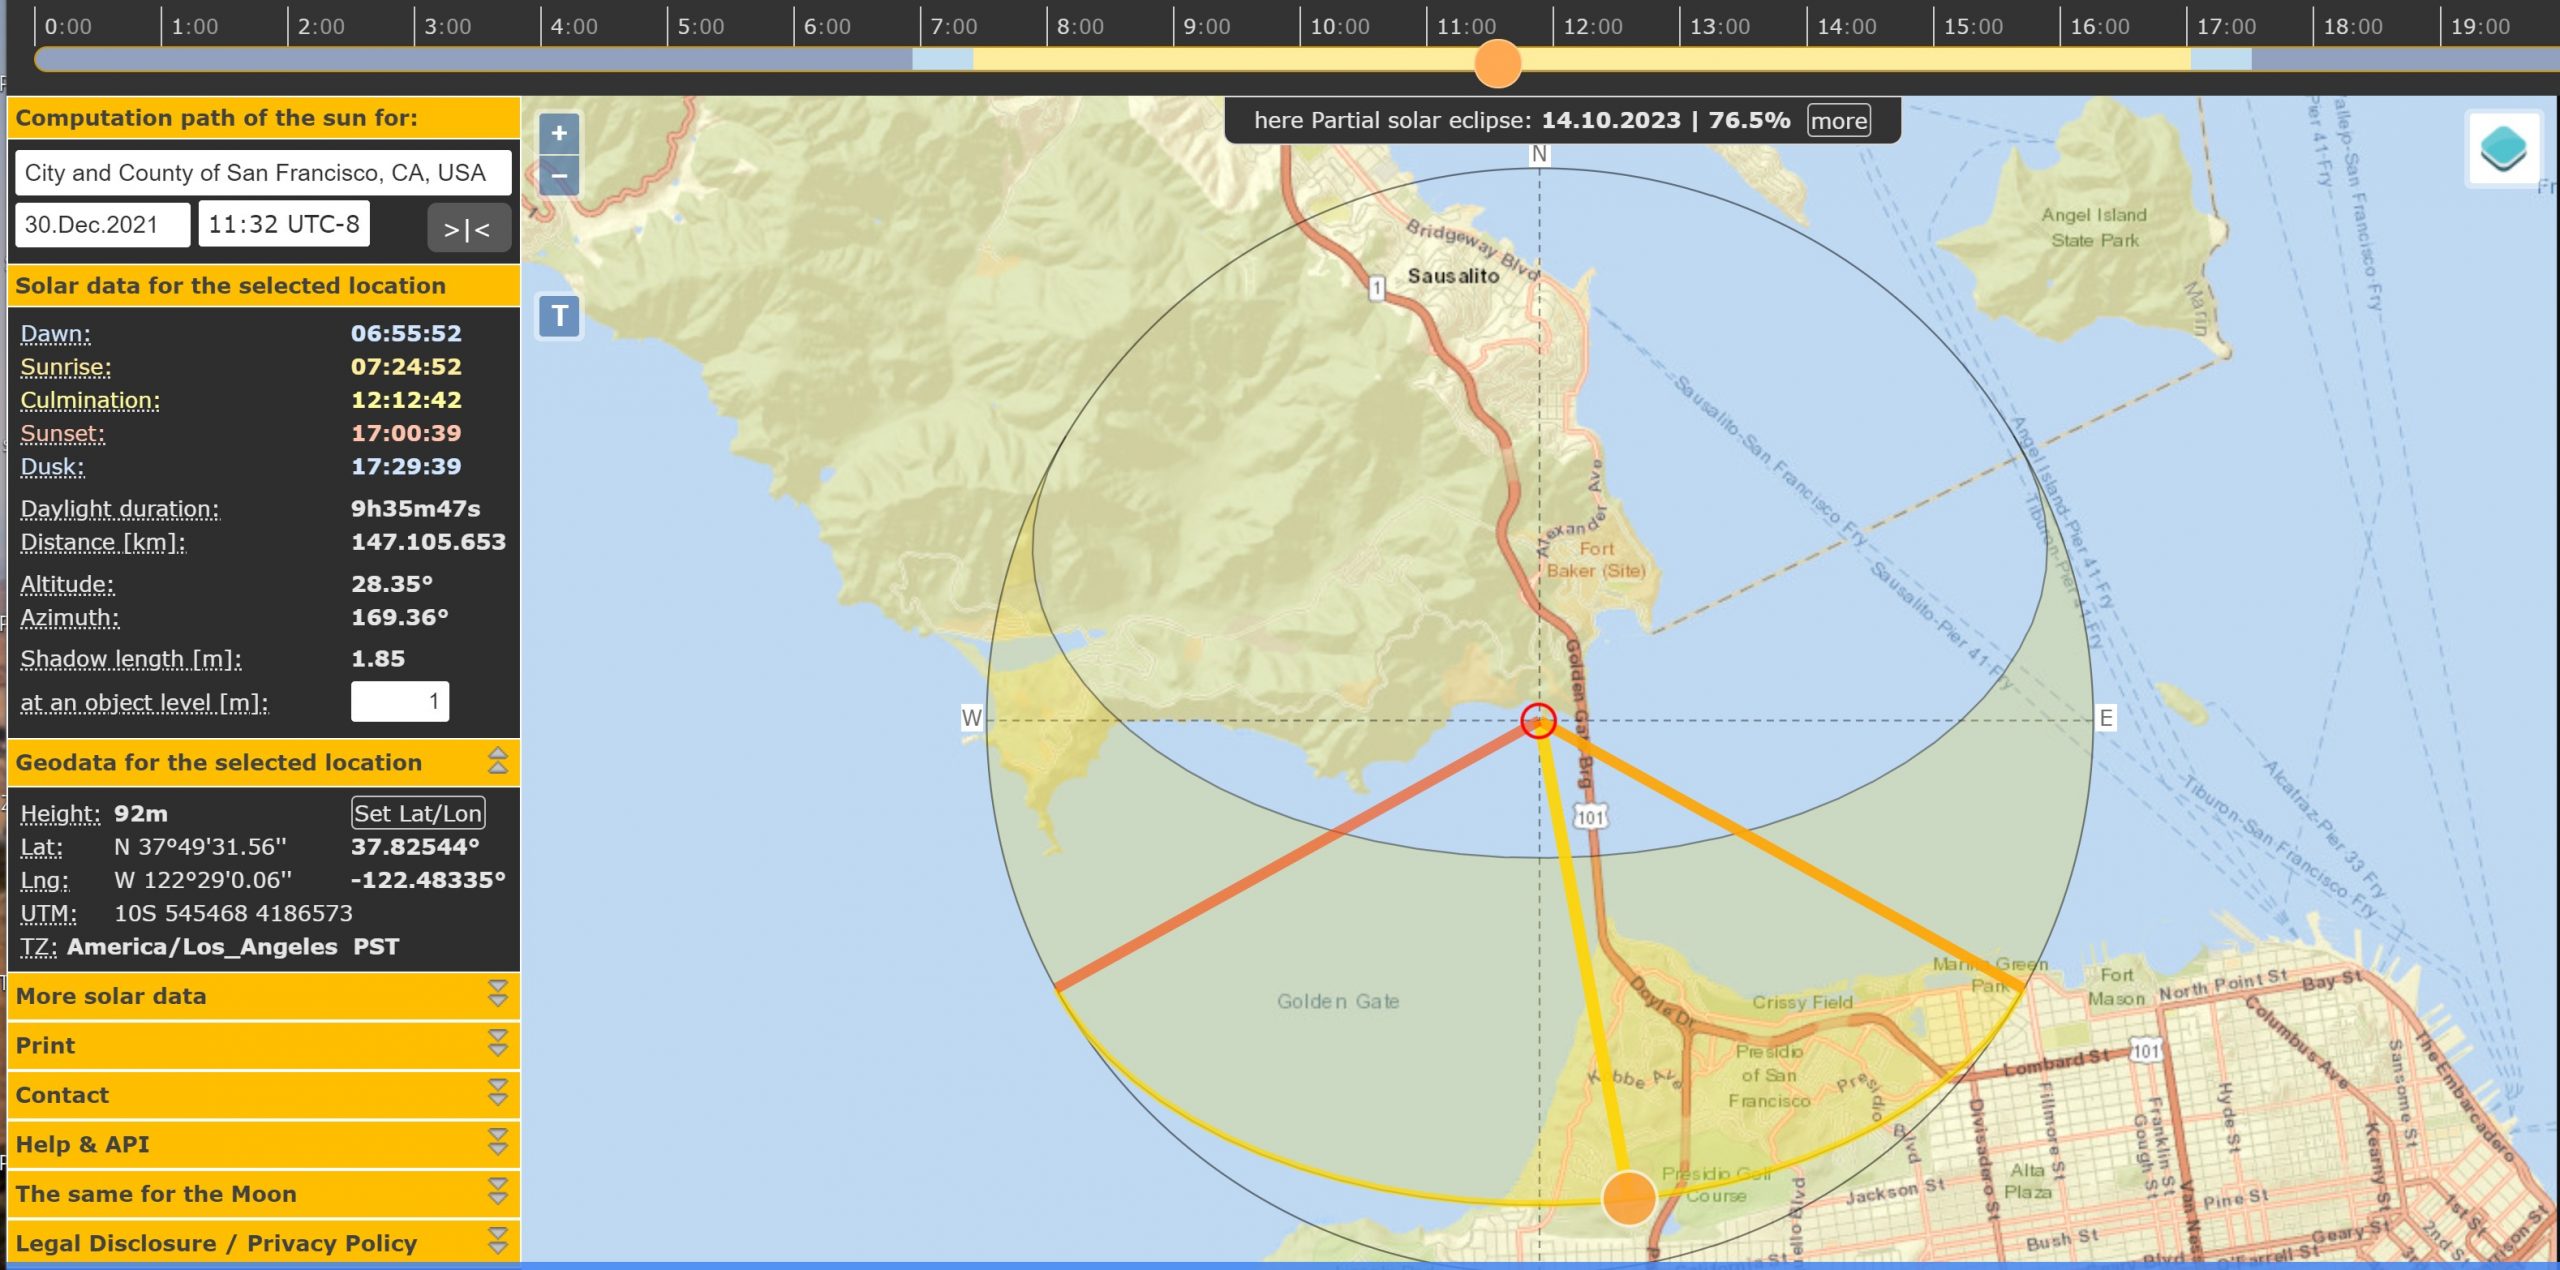
One example that I rely on all the time is SunCalc.org. This website and Android application (sorry, iPhone users) shows the exact time and location of the sunrise and sunset anywhere in the world. When you open it in your browser, it’ll start in Spain. Then just drag the location to where you want to go. The sunrise and sunset will change throughout the year. So you may have to play around with the dates to find the exact location you’re looking for.
3. Backlight or front light?
In the above photo, I was looking for a time of year when the sun would rise behind the city of San Francisco across from the Golden Gate Bridge. In this case, I’d need to get to For Barry before 7:24 a.m. to get the best view with the city backlit. However, if I change the date to June 9, 2021, I can see the sun will set behind Fort Barry and will light up the bridge and the skyline with a sunset glow at 8:30 p.m.
Choosing whether you want the sun in front or behind your subject changes everything about an image. For an easy example, let’s use a city skyline like San Francisco. If the sun is captured behind the city, the edges of the buildings will be brighter than the visible sections. This can create some amazing contrast in an image. It also gives you the chance to make solar flares with wide apertures, or sun stars if you use a tiny aperture around f13-f16.
But having the sunlight your subject from the front can also be pleasing. When the sun’s coming over the horizon in front, it casts a bright red glow over the buildings. Then, as it rises, that glow will turn orange, and finally yellow before the midday light hits. These are two very important considerations to make when you’re planning a trip. As the perfect position for sunrise and sunset will change throughout the year.

4. Learn the weather patterns in your destination’s seasons
Next, we need to talk about the weather. Those ideal conditions we spoke about before can only be predicted in the short term. But, while you can’t know for certain what the weather will be, there are long-term patterns that are well understood. For example, nobody goes to Hawaii between October and April for good reason. And that’s because it doesn’t stop raining. You’ll get discounted flights and accommodations, but you’re going to need a much bigger window of time to capture that perfect sunlight. And if it rains for two weeks straight, it doesn’t matter if the sun is in a perfect position. You’re just not going to get the shot.
Once you find the time of year to capture that perfect sun, do a couple of Google searches to get an understanding of the weather. There are blogs in the English language for nearly every region on Earth. So the information is typically abundant and clear. But if you’re having trouble finding it, try using Google Translate to search in the local language. If it’s a common one, like French, Arabic, Cantonese, or Spanish, you should be able to get a reliable translation.
And if you do decide to go during the rainy season, be prepared with as much waterproof gear as possible! There’re many cheap rain covers and water-proofing sprays that can protect your gear.

5. Find out when the stars, planets, milky way, or northern lights are visible
This one is similar to the weather. But there’s one really important piece of advice that commonly trips up photographers. Don’t go to Iceland, Alaska, or Norway during the Summer Solstice if you’re looking to see the Northern Lights. They’re so far North that the sunlight lasts until 2 or 3 a.m. Which makes viewing the Northern Lights and other astrological phenomena impossible.
But as there are seasons for weather patterns, there are also seasons for astrophotography. Take for example the Milky Way. With the naked eye, it’s possible to see the Milky Way at certain times of the year in dark sky preserves. Some national parks and cities around the world have made an effort to turn out as many lights as possible to make them easier to view. But, you still have to plan for the right time of year.
One of the national parks famous for becoming a dark sky preserve is Jasper National Park in Alberta, Canada. The best times to view it there are between September and early December. This is partly because of sunlight, and partly because of the weather. The fall season is warmer, and many backroads remain accessible at this time of year. When after December, temperatures can easily drop past -4 Fahrenheit (-20 Celcius). Not only is this uncomfortable, but batteries die faster, and bringing your camera from hot to cold can risk condensation getting inside the body and lens.
Another tip is to always plan to go during a New Moon. The full moon can make for an amazing image, but its bright light will obscure the galaxies and stars behind it. The Clear Outside application will tell you the moon status, and other important night sky information. Then, if you’re looking for certain constellations, galaxies, or other astrological phenomena, Stellarium.org has some amazing tools to help ensure you’re in the right place at the right time.
6. What if I get there, and there isn’t an amazing sky?
This is one of the biggest issues with trying to predict the weather. What if you booked a flight to the most amazing landscape to get a single photo. And then, when you finally get there, the light just doesn’t play as it should. You could have done everything right, only for the image to fall apart at that moment. That’s where Lightroom and Photoshop come in. Photoshop has an amazing new tool released in fall 2020 that allows you to effortlessly replace the sky.
This is a super cool trick that can help create stunning images when the weather just doesn’t play like it’s supposed to. Even if you did get a nice sky, this can be fun to play around with! In fact, I used one of the Photoshop skies as the background of my Clear Outside app illustration above. Try it out and have some fun with it! And, if you need some help with Lightroom, take a look at this handy guide on how to get started.
7. Where can I learn more about planning photography?
 I have a lot more tips and in-depth videos about planning for amazing photographs in my Photography Transformational Masterclass! This course has hours of videos and guides teaching you the steps that I have taken to capture all of my favorite photographs as an award-winning, fine-art landscape photographer. And if you’re interested in learning how to take great photos in any situation, take a look at my free web class. Here, you’ll learn how to use my simply 4-step photography process.